BRIGANDINE ABYSS Combat Tips
Hunt leaders, Rally on time, and stop walking into empty maps as a blob.
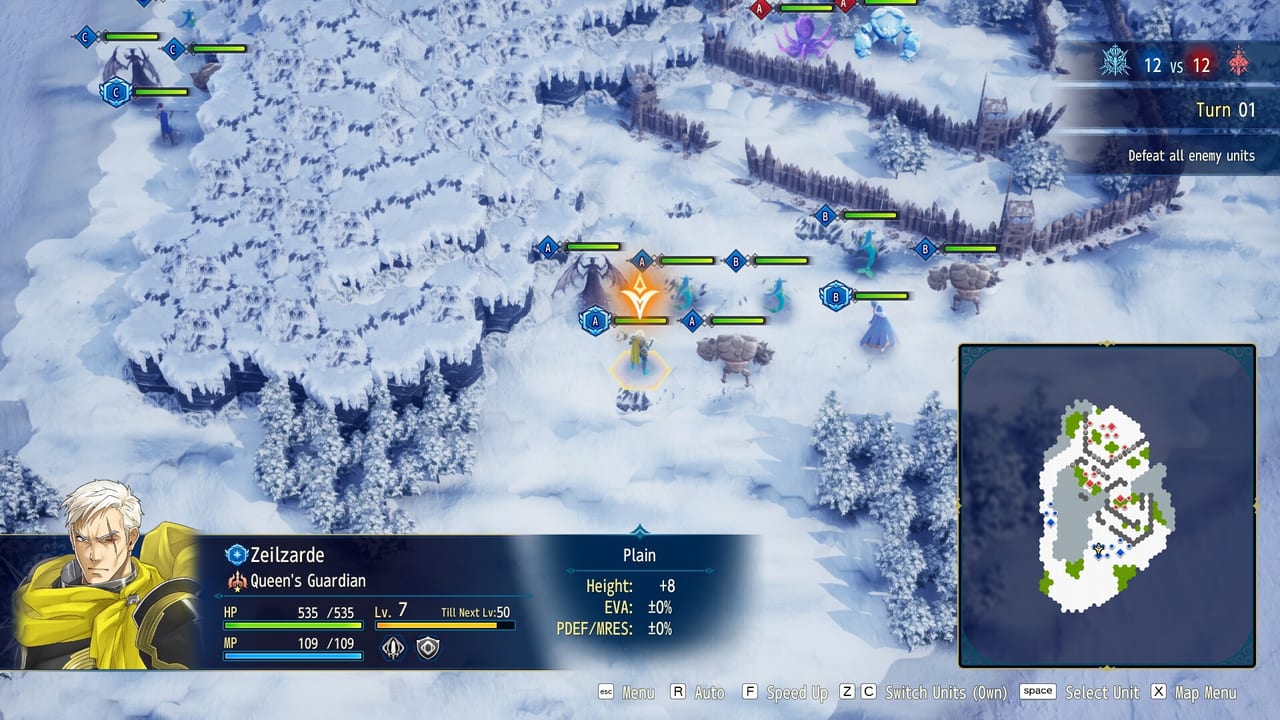
Invasion is hex-grid, turn-based, and slower than the Organization menus suggest. Maps are large. Many of them are empty. You still only bring three squads. This page is the battlefield checklist for BRIGANDINE ABYSS: what to kill first, when to Rally, how height and fliers interact, why clustering loses fights, and why accuracy plus AI feel unfair in a way reviews treated as real.
Pair this with the Rally System page. Rally is a combat verb, not a lore tooltip. For campaign pacing and Event Battle stakes, use the Campaign Walkthrough. Class skills that cannot fire after a move belong on the Class System page; monster roles belong on Monster Summoning.
Kill the leader, end the squad
Each Invasion squad is a leader plus up to five monsters paid in Command Points. Defeat the leader and the retinue flees. That is the fastest win on both sides of the war. It is also the AI’s favorite way to donate a fight: enemy leaders walk forward, eat Zone of Control, and die while their monsters are still in the backline.
Your job is to do the same thing on purpose and not reverse it. Park meat in front of your own leader. Rally a body only when the hex it occupied was not the thing keeping a thief off Garnet. If your leader dies, everything in that squad leaves—including a monster you had absorbed. Do not Rally your only tank into a leader standing on the front hex.
When you are overwhelmed, collapse fire onto the nearest enemy leader. Watching four monsters vanish is how you un-surround a squad. When you are attacking, do not clear every goblin first unless an objective says so. Event Battles sometimes swap the win condition (escape a turn count, protect NPCs). Read the briefing. Standard Invasion is still leader hunting.
Rally timing on a cluttered hex field
Melee maps clog. DualShockers and preview coverage both noted Rally as the valve: pull a monster off a hex so the leader inherits a trait (move, resist, extra action) and so someone else can walk the tile. Dismiss later to put a body back—for a flank, a Zone of Control wall, or a sacrificial hit.
Rally when the monster cannot reach anyone this turn, when you need the Lizard extra action, when you need movement or a resist before a volley, or when the leader must act twice to finish a leader-hunt.
Keep the body when you need Zone of Control, when you are baiting the AI into a chokepoint, when the monster is a flier holding height, or when Dismiss would count as a move and cancel a no-move spell.
Dismiss is not free. RPGamer noted it counts as movement for spell casting. Casters who Rally-Dismiss in the same breath may lose their big spell. Check the skill icon before you treat Dismiss as a free teleport.
Lizard Rally is the broken-feeling case: the leader takes two turns in a row. Bring a lizard as a battery even if its personal damage is mediocre. Do not Rally the lizard if you needed its body to stop a thief from walking onto the leader.
Height, fliers, and empty maps
Height is new relative to older Brigandine entries. Higher elevation improves hit chance and damage. Ranged units and fliers exist to make vertical maps matter. If you are walking every valley with infantry, you are playing the empty map the way reviewers complained about: long approaches, little terrain drama, one AoE waiting at the end.
Put fliers on the high hexes. Put melee in the seams where Zone of Control actually blocks. Do not park three squads on the same contour line so a single area skill paints all of them. Maps with walls, forts, or raise/lower gimmicks are the interesting minority—use the gimmick. The boring majority are won by leader hunts plus height, not by sightseeing.
Do not cluster into AoE
Hex fronts want a line. They do not want a pile. Encirclement buffs exist (more damage, accuracy, crits when you surround a target), so you will be tempted to wrap every enemy. Wrapping is correct against a single leader. Wrapping three of your own squads around one tile is how you feed a breath weapon or a mage.
Spread the three squads enough that one miss or one area hit cannot delete the campaign. Keep a recovery tile behind the line so a missed 75% swing does not strand a wounded knight in three enemy Zones of Control.
Accuracy and AI jank (this is not you being bad)
RPG Site, RPGamer, RPGFan, and others all described the same pair of problems. Physical accuracy feels worse than the percentage on the tooltip; 75% swings miss in clumps. Hard difficulty often reads as enemy stats going up (harder to hit, thicker defense) rather than smarter movement. Thief-type units can become a magic-check. Enemy AI stays still until you enter range, then sometimes yeets a healer or leader into your face.
Play around it instead of pretending it is a ranking you failed:
- Keep a magic answer for high-avoid targets.
- Do not stake an Event Battle on one physical.
- Use encirclement and height to pad accuracy when the tooltip already looks like a coin flip.
- Still hunt leaders, because the AI will keep offering them.
- When you defend, remember the attacker can win by breaching a last line that you do not get as a win condition in reverse; stalling toward a turn limit is a real defensive plan.
Allies act, then enemies act. That split lets you bait, then collapse. It also lets you over-extend on your whole phase and eat fifteen enemy actions with no reply. Take the free hits; do not take the ego march.
Organization is still part of the fight
If a leader is on a quest, they are not in this Invasion. If you moved the garrison during Organization, they are not in that keep. Combat tips cannot fix a castle you emptied. Base Building and Quests and Training are how you arrive at the hex map with three squads that still have items and CP left.
Retail already includes Demo 1.01 quality-of-life on PC (unit color coding, size sliders, edge scroll). Use color coding if you keep mis-clicking ally versus enemy blobs on large maps. Switch 2 is a locked 30fps; that does not change the tactics, only the animation wait.
For whether the combat loop is worth 30 hours, the Review is honest. For launch timeline with no invented patches, see Updates.
Frequently Asked Questions
Quick answers to common questions about BRIGANDINE ABYSS.
What should I attack first in a normal Invasion?
Enemy leaders. Their monsters flee when the leader falls. Clear fodder only when an Event Battle objective says so or when a body is blocking the only path to the leader.
When should I Rally instead of leaving a monster on the field?
Rally when the monster cannot act, when you need its trait (especially Lizard extra action), or when the tile must open. Keep the body for Zone of Control, height control, and any caster who cannot spell after a Dismiss-move.
Do flying units ignore height?
Fliers are how you contest high hexes without walking the valley. Height still changes hit and damage. Put fliers and ranged units on elevation; do not treat the map as flat infantry ground.
Why do my 75% attacks miss so often?
Reviewers flagged accuracy as genuinely swingy, and Hard often looks like extra enemy defense rather than smarter AI. Pad with height, encirclement, and magic; do not bet Event Battles on a single physical swing.